Observation Planning is a very important activity, and should be completed in full before attempting to conduct night-time observations.
During the 2010-11 BSc Project, only 2 nights were available for night observations due to a combination of factors: Completion of CCD Calibration, Bristol night-time weather conditions (cloud cover), University holidays & PhD supervisor/student availability.
In addition, there were typically only 4-5 observing hours available each night. This emphasises the importance of being fully prepared with a detailed Observation Plan. To maximise observing time at night, students should ensure they are fully efficient and adept at using the telescope hardware from previous Day Trial practice sessions.
Many factors may cause deviations from the Observation Plan on the night. One obvious example is a change in cloud cover during the night. Another, less obvious example is that students will be slower during their first few night-time observations, since this will be their first time operating in a night-time environment and a steep learning curve is necessary.
It's therefore important to build a substantial "Wish List"/database of astronomical sources into the Observation Plan.
The more target sources in the plan allow students to be more flexible on the night. A guideline to selecting sources for the Observation Plan is presented below:
Observation Plan Guidelines:
- Select an obvious "anchor" object in the night sky, with a low enough magnitude so that it can be quickly found and located with the naked eye. This makes an ideal first object, and allows immediate calibration of the Telescope Co-ordinate system on the night. For the 2010-11 Project, Betelgeuse was chosen as the "anchor" object.
- Choose objects with varying RA across the night sky. This enables you to cover a large horizontal area of the sky throughout the night, so you can test the seeing conditions across a full 360° swath.
- Choose objects with varying Dec across the night sky. This enables you to cover a large vertical area of the sky throughout the night, so you can test the seeing conditions across as close to ±90° Dec as possible.
- Choose sources with a variety of Magnitudes, to test the ability of the equipment and seeing conditions.
- Ensure you have a good "spread" of objects across the night sky. This allows for testing seeing conditions in different "sectors" of the night sky, and also provides flexibility should one area of the sky become obscured by cloud, for example.
- Ensure you "time" your sources so they're due to rise high enough in the sky for you to optimally observe them in the night sky. A good tactic is to plan to view objects at their highest point/"peak" in their rising/setting arc across the night sky. You should therefore select sources which "peak" at time intervals (e.g. 1 hour apart) so that you have an observation schedule with optimum sources to cover the whole night's viewing session.
- Prioritise objects. Have some "primary" objects which are the primary focus of the observing session, and then "secondary" objects should time permit. This allows efficient allocation of time resources throughout the observation session.
- Fully detail the RA, Dec and Magnitude of every target source in your Observation Plan. In addition, record the Time Observed for each source when you successfully observe them on the night.
- Finally: be flexible! Naturally, the Observation Plan cannot always be followed entirely according to plan. However, if you have prioritised objects and covered a good portion of the night sky as described above, a thorough Observation Plan will allow you to be flexible during the observation session.
Sample Observation Plan:
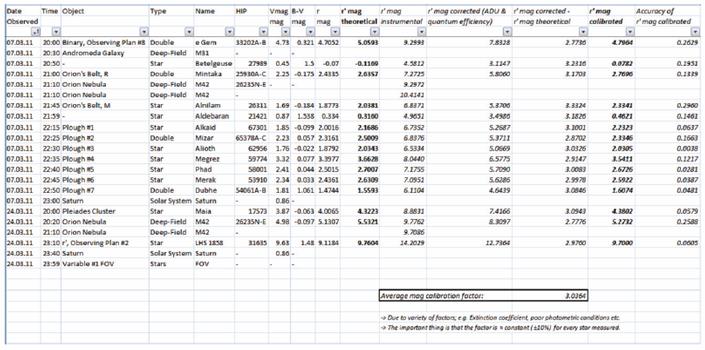
A sample Observation Plan from the 2010-11 Project is presented below, along with time observed for each astronomical source on both observation nights:
| |
| Figure 1: Sample Observation Plan, from the 2010-11 BSc Project. Time observed for each astronomical source has been included. |
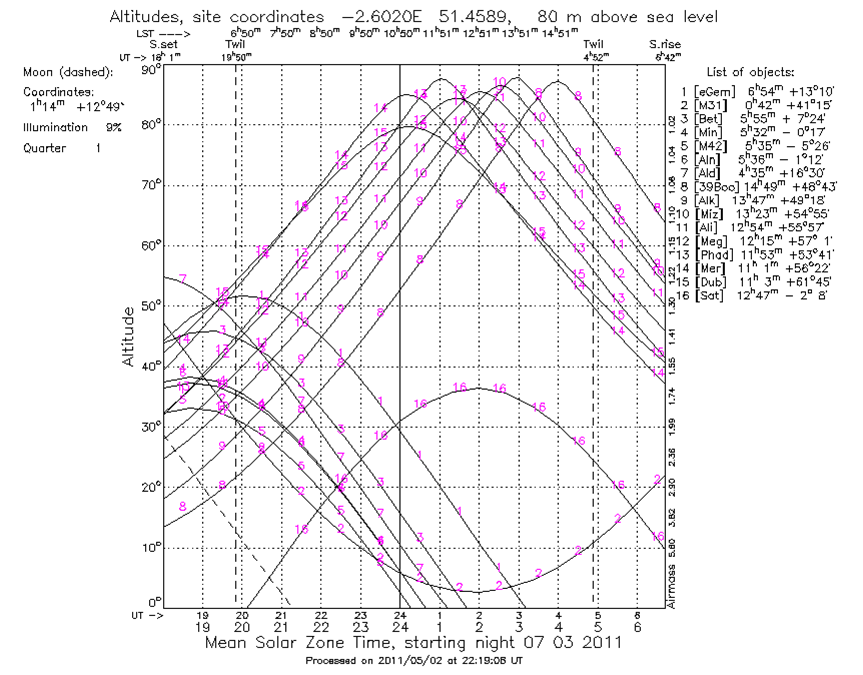
 |
| Figure 2: Observation Plot, showing sources observed on 07.03.11. As can be seen, sources are chosen so that they "peak" in altitude at sequential times during the night observation session. |