Next Previous Up Contents
Next: Subsets Window
Up: Table View Windows
Previous: Parameters Window
Columns Window
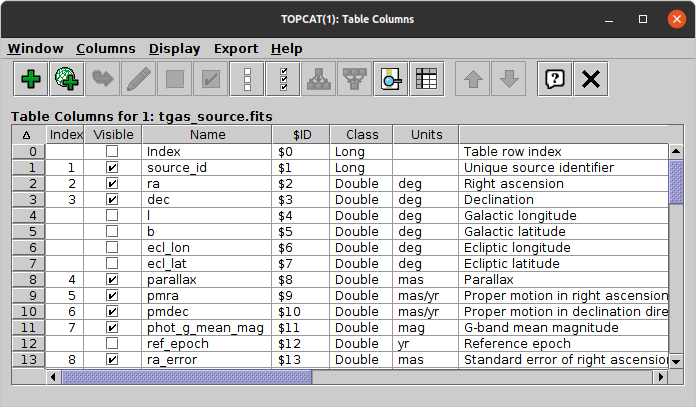
The Columns Window displays a JTable
giving all the information (metadata)
known about each column in the table.
You can display it using the Column Info ( )
button when the chosen table is selected in the
Control Window's Table List.
)
button when the chosen table is selected in the
Control Window's Table List.
The display may take a little bit
of getting used to, since each column in the main data table
is represented by a row in the JTable displayed here.
The order and widths of the columns of the JTable widget can be
changed in the same way as those for the
Data Window JTable,
but this has no effect on the data.
The column on the left labelled Visible
contains a checkbox in each row (one for each column of the data table).
Initially, these are all ticked.
By clicking on those boxes, you can toggle them between ticked and
unticked. When unticked, the column in question will become hidden.
The row can still be seen in this window, but the corresponding data
column is no longer a part of
the Apparent Table, so will not be seen
in the Data Window or appear in
exported versions of the table.
You can tick/untick multiple columns at once by highlighting a set of
rows by dragging the mouse over them and then using the
Hide Selected ( ) or
Reveal Selected (
) or
Reveal Selected ( )
toolbar buttons or menu items.
If you want to hide or reveal all the columns in the table, use the
Hide All (
)
toolbar buttons or menu items.
If you want to hide or reveal all the columns in the table, use the
Hide All ( ) or
Reveal All (
) or
Reveal All ( ) buttons.
If you select one of the JTable rows by clicking on it,
the table view in the Data Window
will be scrolled sideways so that the corresponding data column
is visible in (approximately) the middle of the screen.
This can be a boon if you are dealing with a table that
contains a large number of columns.
Each column in the displayed JTable corresponds to one piece of
information for each of the columns in the data table -
column name, description, UCD etc.
Tables of different types (e.g. ones read from different input formats)
can have different categories of metadata. By default a metadata
category is displayed in this JTable if at least one
table column has a non-blank
value for that metadata category, so for instance if no table columns
have a defined UCD then the UCD column will not appear.
Categories can be made to appear and disappear however by using the
Display menu.
The metadata items are as follows:
-
Index
- The index of the column in the current
Column Set.
The column with value "1" here will be the leftmost one
in the Data window etc.
This value is blank for hidden columns.
Sorting on this column (by clicking its header) will show all
the visible table columns in order at the top of the display.
-
Visible
- Indicates whether the column is part of the Apparent Table.
If this box is not filled in,
then for most purposes the column will be hidden from display.
You can toggle visibility by clicking on this column.
-
Name
- The name of the column.
-
$ID
- A unique and unchanging ID value for each column. These are useful
in defining algebraic expressions (see Section 7) since they are
guaranteed unique for each column. Although the column Name can
be used as well, the Name may not be unique and may not have the
correct form for use in an algebraic expression.
-
Class
- The Java class of the items in that column. You don't have to know
very much Java to understand these; they are Float or Double for
floating point numbers; Byte, Short, Integer or Long for integer
numbers, Boolean for a logical (true/false) flag,
or String for a string of ASCII or Unicode characters.
There are other possibilities, but these will cover most.
The characters '[]' after the name of the class indicates that each
cell in the column holds an array of the indicated type.
-
Shape
- Cells of a table can contain arrays as well as scalars.
If the column contains an array type, this indicates the shape that
it should be interpreted as. It gives the dimensions in column-major
order. The last element may be a '*' to indicate that the size
of the array may be variable. For scalar columns, this item will be blank.
-
Element Size
- Gives the size of a single element from a scalar or array column.
It usually denotes the fixed length, if any, of a String value.
-
Units
- The units in which quantities in this column are expressed.
-
Domain
- Indicates whether TOPCAT recognises this column as representing
a particular kind of value such as a timestamp.
-
Expression
- The algebraic expression defining the values in this column.
This will only be filled in if the column in question is a
synthetic column
which you have added, rather than one present in
the data in their original loaded form.
-
Description
- A textual description of the function of this column.
-
UCD
- The UCD associated with this column, if one is specified.
UCDs are Uniform
Content Descriptors, and indicate the semantics
of the values in this column.
-
UCD Description
- If the string in the UCD column is the identifier of a known UCD,
the standard description associated with that UCD is shown here.
-
XType
- The "extended data type" associated with this column.
The standard values for xtype are described in the IVOA
DALI
standard.
There may be other items in the list specific to the table in question.
You can edit most of these items, e.g. to rename a column or
change the expression defining a synthetic column,
by double-clicking on them as usual.
By default, the order in which the rows are displayed is
determined by the table's current
Column Set.
However, you can change the display order in this window by
clicking on the column headers (in the same way as for some other JTables).
The little up arrow at the top left of the scrolled JTable display
indicates that the display is in its "natural" (Column Set) order,
but by clicking on headers you can sort by column name, units UCD etc.
Clicking sorts up, clicking again sorts down, and a third time
(or clicking on the top left) restores natural order.
You can change the order of the columns in the
Column Set by dragging the
grey number cell at the left of the corresponding row up or down.
Note however this is only possible for non-hidden columns,
and it only works if this JTable is
currently displayed either in its natural order or sorted by
the Index column (see above) -
dragging rows wouldn't have any effect if some other sort order was active.
An alternative way to change Column Set order
is to drag the column headers left or right
in the Data Window.
A good way to find a column in the
Data window if your table is too
wide to do it by browsing is to sort the table in this window
on some suitable item (e.g. Name, Units, UCD), scroll to the
column of interest, and then click on it;
that causes the view in the Data Window to scroll
sideways so that the selected column is visible.
The following buttons are available in the toolbar:
-
 New Synthetic Column
- This pops up a
Synthetic Column Window
which allows you to define a new column in terms of the existing ones
by writing an algebraic expression.
The new column will be added by default after the last selected
column, or at the end if none is selected.
-
 Add Sky Coordinate Columns
- This pops up a
Sky Coordinates Window
which allows you to define a pair of new sky coordinate columns based on
an existing pair of sky coordinate columns.
-
 Replace Column With Synthetic
- If a single column is selected, then clicking this button will
pop up a
Synthetic Column dialogue
to replace the selected column with a new synthetic one.
The dialogue is initialised with the same name, units etc as the
selected column, and with an expression that evaluates to its value.
You can alter any of these, and the new column will replace the
old one, which will be hidden and renamed by appending a suffix
like "_old" to its name.
-
 Edit Column Definition
- If a single column is selected, then clicking this button will
pop up a
Synthetic Column dialogue
that lets you edit its metadata, and Expression if it has one,
in place.
-
Hide Selected Column(s)
- If any of the columns are selected, then clicking this button
will hide them, that is, remove them from the
current Column Set.
This has the same effect as deselecting all the checkboxes corresponding
to these columns in the Visible column.
-
Reveal Selected Column(s)
- If any of the columns are selected, then clicking this button
will make sure they are visible, that is, that they appear in
the current Column Set.
This has the same effect as selecting all the checkboxes corresponding
to these columns in the Visible column.
-
Hide All Columns
- Clicking this button will hide all the columns in the table;
the table will have no columns visible in it following this.
If you just want to see a few columns, it may be convenient to use this
button and then select a few visible ones individually to reveal.
-
Reveal All Columns
- Clicking this button will ensure that all the table's columns
are visible (none are hidden).
-
 Explode Array Column
- If a column is selected which has an array type and a fixed number
of elements, clicking this button
will replace it with scalar-valued columns containing each of its elements.
For instance if a column PMAG contains a 5-element vector of type
float[] representing magnitudes in 5 different bands,
then selecting it and hitting this button will hide PMAG and
insert 5 new Float-type columns PMAG_1...PMAG_5
in its place each containing one of the magnitudes.
If the column does not have a fixed number of elements listed in
the Shape column of this window, this button is disabled.
In that case, if you know how many columns you want to explode it into,
you can enter that value into the Shape field by double-clicking on it.
This will only work for columns that are actually arrays.
-
 Collapse Columns to Array
- If multiple (N) numeric columns are selected,
clicking this button will prompt for the name of a new column
containing N-element array values, collected from all
the selected columns.
Currently, the output type will always be
double[],
and blank values in the input columns will show up as blank
array elements (NaNs).
Currently, the elements in the output column will appear in the
order of the input columns' appearance in the table,
regardless of the current ordering of the rows in this window;
the new column's Description text lists the input columns in order,
if there are not too many.
The effect is more or less the opposite of the Explode option above.
-
 Search Column
- Pops up the Column Search Window
that allows you to find rows in the display with a given field
matching text that you enter.
It can be useful if you have a very wide data table.
-
 Import as Table
- The table of column metadata as displayed by this window
(rows corresponding to table columns and columns corresponding
to items of metadata) is itself a table.
This action loads it into TOPCAT as a new table so it can be
manipulated in all the usual ways.
-
 Sort Selected Up
- If a single column is selected then the table's current
Sort Order will be set to sort ascending on
that column. Otherwise this action is not available.
-
 Sort Selected Down
- If a single column is selected then the table's current
Sort Order will be set to sort descending on
that column. Otherwise this action is not available.
Several of these actions operate on the currently selected column
or columns. You can select columns by clicking on the corresponding
row in the displayed JTable as usual.
As well as the normal menu, right-clicking over one of the columns
in the displayed table will present a
Column Popup Menu, which provides a convenient
way to do some things with the column under the mouse cursor:
-
Search
- Pops up the Column Search Window
that allows you to find rows in the display
for which the chosen column value matches text you enter.
It can be useful if you have a very wide data table.
-
Sort up
- Sorts the table rows according to ascending value of the contents of
the column. Only available if some kind of order (e.g. numeric or
alphabetic) can sensibly be applied to the column.
-
Sort down
- Sorts the table rows according to descending value of the contents of
the column. Only available if some kind of order (e.g. numeric or
alphabetic) can sensibly be applied to the column.
-
Hide
- Hides the column. It can be reinstated from the
Display menu.
Next Previous Up Contents
Next: Subsets Window
Up: Table View Windows
Previous: Parameters Window
TOPCAT - Tool for OPerations on Catalogues And Tables
Starlink User Note253
TOPCAT web page:
http://www.starlink.ac.uk/topcat/
Author email:
m.b.taylor@bristol.ac.uk
Mailing list:
topcat-user@jiscmail.ac.uk